HyperRAM Driver Usage Instructions
English | 中文
Introduction
HyperRAM is a high-performance, low-latency external memory primarily used in embedded systems, providing additional storage capacity and fast data access. Its main features and principles are as follows:
Features
High-Speed Data Access: HyperRAM offers high data transfer rates, making it ideal for applications that require fast read/write operations, such as image processing and real-time data handling.
Low Power Consumption: Compared to other types of memory, HyperRAM is designed with low power consumption, making it suitable for battery-powered embedded devices.
Extended Storage: HyperRAM provides extra storage space for microcontrollers or other processors, addressing the issue of insufficient built-in RAM.
Simplified Design: HyperRAM typically uses simple interfaces, simplifying hardware design and system integration.
Principles
Serial Interface: HyperRAM typically communicates via SPI or similar serial interfaces, making connections and data transfers efficient.
Dynamic Random Access Memory (DRAM): HyperRAM is based on DRAM technology, utilizing capacitors to store data, which allows for high density and large storage capacity.
Memory Controller: A memory controller enables the microcontroller to manage data transfers with HyperRAM and control read/write operations.
Page Mode: HyperRAM supports page mode operation, allowing more efficient data transfers and reduced access latency.
HyperRAM is widely used in embedded systems, particularly in applications where high storage speed and energy efficiency are critical.
This example demonstrates how to use the HyperRAM driver for read/write testing on the EtherKit development board.
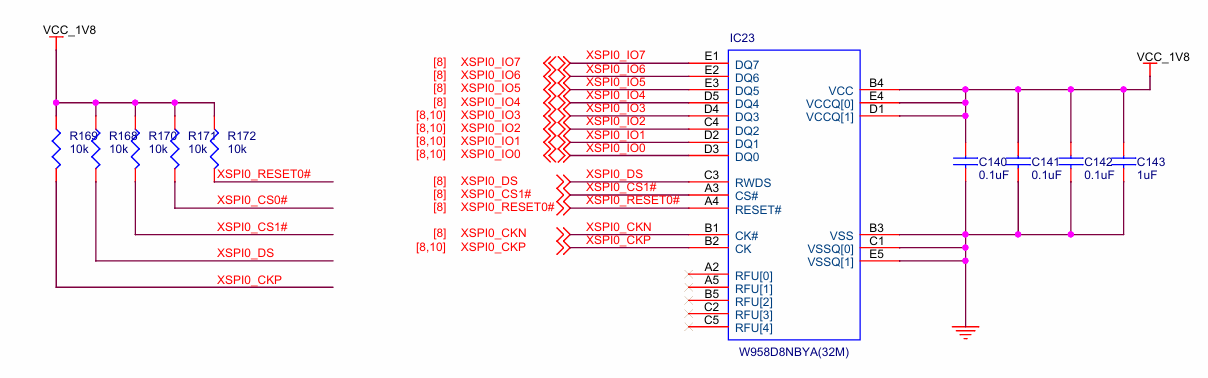
Hardware Overview
Software Overview
The source code for this example is located in ../library/HAL_Drivers/drv_hyperram.c:
/*
 * Copyright (c) 2006-2024, RT-Thread Development Team
 *
 * SPDX-License-Identifier: Apache-2.0
 *
 * Change Logs:
 * Date           Author       Notes
 * 2024-10-28     yuanjie      first version
 */

#include <rtthread.h>
#include "hal_data.h"
#ifdef BSP_USING_HYPERRAM

#define DRV_DEBUG
#define LOG_TAG             "drv.hyper"
#include <drv_log.h>

#define PSRAM_BANK_ADDR                 ((uint32_t)0x44000000UL)    // XSPI0 CS1
#define PSRAM_SIZE                      ((uint32_t)0x2000000UL)     // 32MBytes
#define PSRAM_DATA_WIDTH                16

#ifdef RT_USING_MEMHEAP_AS_HEAP
static struct rt_memheap system_heap;
#endif

static int HYPERRAM_Init(void)
{
    int result = RT_EOK;
    /* XSPI initial settings */
    /* Initialize the PSRAM controller */
    if (R_XSPI_HYPER_Open(&g_hyperbus0_ctrl, &g_hyperbus0_cfg) != FSP_SUCCESS)
    {
        LOG_E("HYPER RAM init failed!");
        result = -RT_ERROR;
    }
    else
    {
        LOG_D("PSRAM init success, mapped at 0x%X, size is %d bytes, data width is %d", PSRAM_BANK_ADDR, PSRAM_SIZE, PSRAM_DATA_WIDTH);
#ifdef RT_USING_MEMHEAP_AS_HEAP
        /* If RT_USING_MEMHEAP_AS_HEAP is enabled, PSRAM is initialized to the heap */
        rt_memheap_init(&system_heap, "psram", (void *)PSRAM_BANK_ADDR, PSRAM_SIZE);
#endif
    }

    return result;
}
INIT_BOARD_EXPORT(HYPERRAM_Init);

#ifdef DRV_DEBUG
#ifdef FINSH_USING_MSH
int psram_test(void)
{
    int i = 0;
    uint32_t start_time = 0, time_cast = 0;
#if PSRAM_DATA_WIDTH == 8
    char data_width = 1;
    uint8_t data = 0;
#elif PSRAM_DATA_WIDTH == 16
    char data_width = 2;
    uint16_t data = 0;
#else
    char data_width = 4;
    uint32_t data = 0;
#endif

    /* write data */
    LOG_D("Writing the %ld bytes data, waiting....", PSRAM_SIZE);
    start_time = rt_tick_get();
    for (i = 0; i < PSRAM_SIZE / data_width; i++)
    {
#if PSRAM_DATA_WIDTH == 8
        *(__IO uint8_t *)(PSRAM_BANK_ADDR + i * data_width) = (uint8_t)0x55;
#elif PSRAM_DATA_WIDTH == 16
        *(__IO uint16_t *)(PSRAM_BANK_ADDR + i * data_width) = (uint16_t)0x5555;
#else
        *(__IO uint32_t *)(PSRAM_BANK_ADDR + i * data_width) = (uint32_t)0x55555555;
#endif
    }
    time_cast = rt_tick_get() - start_time;
    LOG_D("Write data success, total time: %d.%03dS.", time_cast / RT_TICK_PER_SECOND,
          time_cast % RT_TICK_PER_SECOND / ((RT_TICK_PER_SECOND * 1 + 999) / 1000));

    /* read data */
    LOG_D("Start reading and verifying data, waiting....");
    for (i = 0; i < PSRAM_SIZE / data_width; i++)
    {
#if PSRAM_DATA_WIDTH == 8
        data = *(__IO uint8_t *)(PSRAM_BANK_ADDR + i * data_width);
        if (data != 0x55)
        {
            LOG_E("PSRAM test failed!");
            break;
        }
#elif PSRAM_DATA_WIDTH == 16
        data = *(__IO uint16_t *)(PSRAM_BANK_ADDR + i * data_width);
        if (data != 0x5555)
        {
            LOG_E("PSRAM test failed!");
            break;
        }
#else
        data = *(__IO uint32_t *)(PSRAM_BANK_ADDR + i * data_width);
        if (data != 0x55555555)
        {
            LOG_E("PSRAM test failed!");
            break;
        }
#endif
    }

    if (i >= PSRAM_SIZE / data_width)
    {
        LOG_D("PSRAM test success!");
    }

    return RT_EOK;
}
MSH_CMD_EXPORT(psram_test, XSPI XIP hyper ram test)
#endif /* FINSH_USING_MSH */
#endif /* DRV_DEBUG */
#endif /* BSP_USING_HYPERRAM */
Compilation & Download
RT-Thread Studio: Download the EtherKit resource package from the RT-Thread Studio package manager, create a new project, and then compile it.
IAR: First, double-click
mklinks.batto generate links to thert-threadandlibrariesfolders. Then use theEnvtool to generate an IAR project, and finally double-clickproject.ewwto open the IAR project and compile it.
Once the compilation is completed, connect the development board’s Jlink interface to the PC and download the firmware to the development board.
Run Results
Press the reset button to restart the development board and observe the terminal logs:
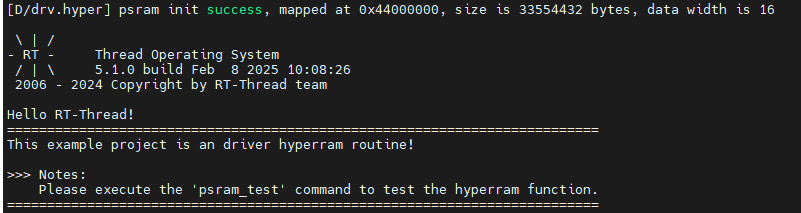
Execute the psram_test command to start the HyperRAM read/write test:
msh >psram_test
[D/drv.hyper] Writing the 33554432 bytes data, waiting....
[D/drv.hyper] Write data success, total time: 0.866S.
[D/drv.hyper] Start reading and verifying data, waiting....
[D/drv.hyper] PSRAM test success!